Day 5 Task: Advanced Linux Shell Scripting for DevOps Engineers with User management


Introduction:
Welcome back to Day 5 of our #90daysdevops journey! Today, we're immersing ourselves in the world of Shell Scripting, where we'll uncover the secrets of automation. Shell scripting isn't just about executing commands—it's about crafting solutions to streamline our workflows, save time, and enhance productivity. So, let's roll up our sleeves and dive into the realm of automation!
Creating Directories Dynamically
Creating directories manually can be a tedious task, especially when dealing with a large number of directories. Fortunately, Shell Scripting provides us with a powerful solution to automate this process. Let's dive into the script createDirectories.sh and understand how it works.
#!/bin/bash

# Get directory name and range from user input
directory_name=$1
start=$2
end=$3

# Loop through the specified range to create directories
for ((i=start; i<=end; i++))
do
    mkdir -p "${directory_name}${i}"
done
This script takes three arguments: the directory name, the start number, and the end number of directories to create. By using a loop, we iterate through the specified range and create directories with unique names. This approach not only saves time but also ensures consistency and accuracy in directory creation.
Automating Backups with Shell Scripting
Data loss can have serious consequences for any organization. That's why regular backups are crucial for ensuring data integrity and continuity. Let's explore how we can automate the backup process using Shell Scripting.
#!/bin/bash

# Define backup and source directories
backup_dir="/path/to/backup"
source_dir="/path/to/source"

# Create a compressed archive of the source directory
tar -czf "$backup_dir/backup_$(date +%Y%m%d_%H%M%S).tar.gz" "$source_dir"
This script creates a compressed archive of the source directory and saves it to the backup directory with a timestamp. By scheduling this script to run at regular intervals using Cron, we can automate the backup process and ensure that our data is always protected.
Understanding Cron and Crontab
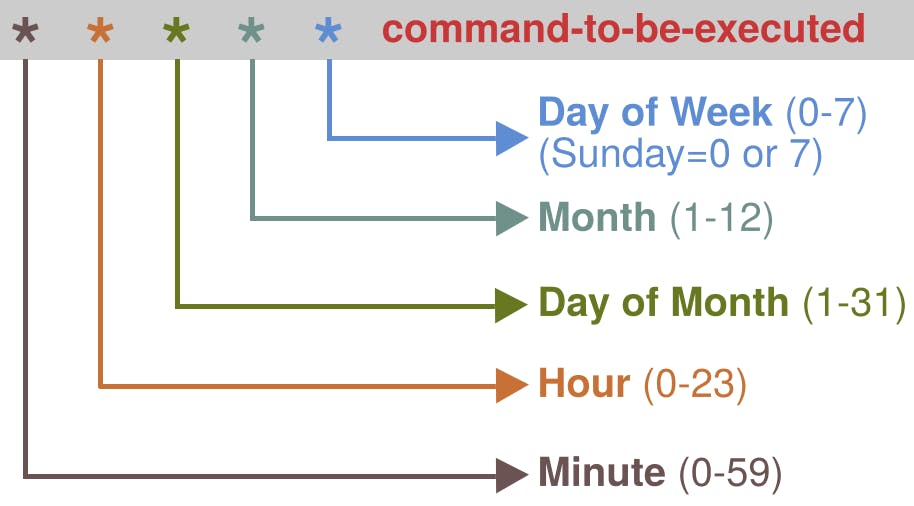
Cron is a time-based job scheduler in Unix-like operating systems. It allows users to schedule tasks to run at specific times or intervals automatically. Crontab is a command-line utility used to create, edit, and manage cron jobs. Let's explore some essential commands related to Cron and Crontab:
crontab -e: Edit the crontab file.crontab -l: Display the contents of the crontab file.crontab -r: Remove the current user's crontab file.
Real-World Example: Automating Database Backups
Let's consider a real-world scenario: automating database backups for a web application. By scheduling a backup script to run daily at midnight, we can ensure that our database is backed up regularly without manual intervention.
0 0 * * * /path/to/backup_script.sh
This cron job specifies that the backup script should be executed at midnight every day. By configuring cron jobs like this, we can automate repetitive tasks and improve overall efficiency.
Automating Backups with Cron
Cron jobs are defined in a crontab file, which can be edited using the crontab command. By specifying the time, date, and frequency of execution, we can schedule tasks to run automatically according to our requirements. Let's explore some additional commands related to Cron and Crontab:
crontab -e: Edit the current user's crontab file.crontab -l: List the current user's cron jobs.crontab -u username -e: Edit another user's crontab file.crontab -u username -l: List another user's cron jobs.
Exploring User Management
User Management is a critical aspect of system administration. Let's take a closer look at creating users, setting passwords, and managing user accounts using Shell Scripting.
Adding Users:
To add a new user, we can use the useradd command followed by the desired username.
#!/bin/bash

# Add a new user
username="newuser"
useradd "$username"
Setting Passwords:
Once the user is added, we can set a password for the user using the passwd command.
#!/bin/bash

# Set password for the new user
password="password123"
echo "$username:$password" | chpasswd
Displaying User Information:
We can display user information using the id command.
#!/bin/bash

# Display user information
id "$username"
This script adds a new user, sets a password for the user, and displays user information. User management tasks like this can be automated to streamline administrative processes and ensure consistent user provisioning across systems.
Conclusion:
As we conclude Day 5 of our #90daysdevops journey, we've unlocked the power of automation with Shell Scripting. From dynamically creating directories to scheduling backups and managing users, we've learned how to wield Shell Scripting like a pro. But our journey doesn't end here—it's just the beginning. So, let's continue to explore, experiment, and embrace the wonders of automation on our DevOps odyssey. Together, we'll script our way to success!